1 Like
How to upload image using multer in node.js?
Last updated on Feb. 4, 2021, 7:30 p.m. by rugved
Introduction
Whenever you make a website like social media app or blog app , you will most probably have feature where you will allow user to upload images. That’s what we will build here — minimal file upload server.
What are we building?
We are going to build a simple application using node.js which is capable of uploading sinlge/multiple images to server.
There are various ways by which we can upload image to server using node.js. One of the easiest and common ways to do it is by using multer library.
Multer is a node.js middleware for handling multipart/form-data, which is primarily used for uploading files.
Final project Structure
For reference here is the final project structure you will have after completing this article.

Setup
1. First open cmd and run the following command to check if you have node installed. If you don’t have it installed follow this article to install node.js.
node -v
2. Create a project directory and cd into it
mkdir file-upload-app
cd file-upload-app
Lets begin with the code:
1. Run npm init to start create package.json.
npm init -y
2. Install express
npm install express
3. Install multer
npm install multer
4. Create a folder named public in root directory. Here we will later place our html files.Also create a uploads folder.
5. Now lets create a html page which contains 2 simple forms.
- To upload single image
<form method="POST" action="/profile-upload-single" enctype="multipart/form-data">
    <div>
        <label>Upload profile picture</label>
        <input type="file" name="profile-file" required/>
    </div>
    <div>
        <input type="submit" value="Upload" />
    </div>
</form>
Single image upload form of index.html
- To upload multiple images
<form method="POST" action="/profile-upload-multiple" enctype="multipart/form-data">
    <div>
        <label>Upload multiple profile picture</label>
        <input type="file" name="profile-files" required multiple  />
    </div>
    <div>
        <input type="submit" value="Upload" />
    </div>
</form>
Multiple image upload form of index.html
6. Final html file (public/index.html) will look like.
index.html
<!DOCTYPE html>
<head>
    <title>Profile form</title>
</head>
<body>
    <form method="POST" action="/profile-upload-single" enctype="multipart/form-data">
        <div>
            <label>Upload profile picture</label>
            <input type="file" name="profile-file" required/>
        </div>
        <div>
            <input type="submit" value="Upload" />
        </div>
    </form>

    <hr>

    <form method="POST" action="/profile-upload-multiple" enctype="multipart/form-data">
        <div>
            <label>Upload multiple profile picture</label>
            <input type="file" name="profile-files" required multiple  />
        </div>
        <div>
            <input type="submit" value="Upload" />
        </div>
    </form>
</body>
</html>
7. Create index.js in current root project directory.
8. Import express,multer and initialize port variable to 3000.
var express = require('express')
var multer  = require('multer')
var app = express()
var port = 3000;
9. We need to tell multer where we want to upload images and by what name should the file be saved. For that we create a object as
var storage = multer.diskStorage({
    destination: function (req, file, cb) {
      cb(null, './uploads')
    },
    filename: function (req, file, cb) {
      cb(null, file.originalname)
    }
})
var upload = multer({ storage: storage })
This will set image upload destination to “uploads” folder and filename will be same as uploaded file’s original name.
10. To understand upcoming code lets consider a general example and understand it.
// General Example
app.use('/a',express.static('/b'));

// Above line would serve all files/folders inside of the 'b' directory
// And make them accessible through http://localhost:3000/a.
We want to upload image, then store it to a “uploads” directory and make image accessible on web page.
app.use(express.static(__dirname + '/public'));
app.use('/uploads', express.static('uploads'));
So now when we upload image (lets say sample.png) it will be stored uploads folder and will be accessible on web page on the url http://localhost:3000/uploads/sample.png
11. Route to upload single image
app.post('/profile-upload-single', upload.single('profile-file'), function (req, res, next) {
  // req.file is the `profile-file` file
  // req.body will hold the text fields, if there were any
  console.log(JSON.stringify(req.file))
  var response = '<a href="/">Home</a><br>'
  response += "Files uploaded successfully.<br>"
  response += `<img src="${req.file.path}" /><br>`
  return res.send(response)
})
12. Route to upload multiple images
app.post('/profile-upload-multiple', upload.array('profile-files', 12), function (req, res, next) {
    // req.files is array of `profile-files` files
    // req.body will contain the text fields, if there were any
    var response = '<a href="/">Home</a><br>'
    response += "Files uploaded successfully.<br>"
    for(var i=0;i<req.files.length;i++){
        response += `<img src="${req.files[i].path}" /><br>`
    }

    return res.send(response)
})
Lets look at the entire code at once now
index.js
var express = require('express')
var multer  = require('multer')
var port = 3000;

var app = express()

var storage = multer.diskStorage({
    destination: function (req, file, cb) {
      cb(null, './uploads')
    },
    filename: function (req, file, cb) {
      cb(null, file.originalname)
    }
})
var upload = multer({ storage: storage })

/*
app.use('/a',express.static('/b'));
Above line would serve all files/folders inside of the 'b' directory
And make them accessible through http://localhost:3000/a.
*/
app.use(express.static(__dirname + '/public'));
app.use('/uploads', express.static('uploads'));

app.post('/profile-upload-single', upload.single('profile-file'), function (req, res, next) {
  // req.file is the `profile-file` file
  // req.body will hold the text fields, if there were any
  console.log(JSON.stringify(req.file))
  var response = '<a href="/">Home</a><br>'
  response += "Files uploaded successfully.<br>"
  response += `<img src="${req.file.path}" /><br>`
  return res.send(response)
})

app.post('/profile-upload-multiple', upload.array('profile-files', 12), function (req, res, next) {
    // req.files is array of `profile-files` files
    // req.body will contain the text fields, if there were any
    var response = '<a href="/">Home</a><br>'
    response += "Files uploaded successfully.<br>"
    for(var i=0;i<req.files.length;i++){
        response += `<img src="${req.files[i].path}" /><br>`
    }

    return res.send(response)
})


app.listen(port,() => console.log(`Server running on port ${port}!`))
Time to see the results
Open the terminal and cd to current project directory and enter
node index.js
Visit http://localhost:3000/
Output:
Initial view:
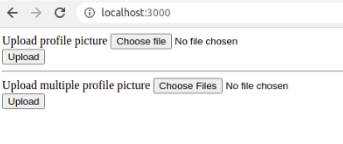
Before clicking upload:

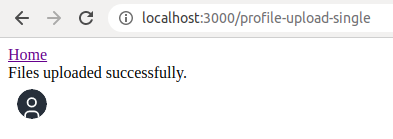
Output (Single image upload):
You will get the following success message and image will be uploaded to “uploads” folder in project root directory
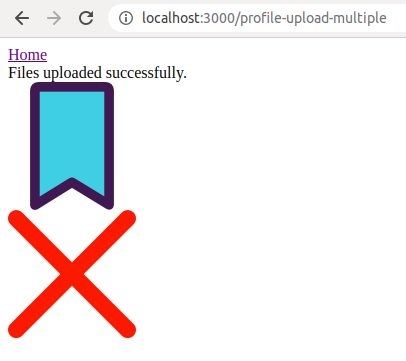
Output (Multiple image upload):
Uploaded two random images for testing.
To check if our server actually worked checkout uploads folder in root directory.
As you can see that the images we have uploaded are saved in “uploads” folder.
That’s all ! Now we have a website which is capable of uploading single/multiple images to server.
To know about more options like restricting file size, accepting files with specific extensions only etc checkout multer.
Conclusion
So we have successfully built a website containing forms to upload single / multiple images using multer library.
For code you can visit https://github.com/RugvedB/Nodejs-Multer-File
1 Like

by rugved
KJ Somaiya College of Engineering Mumbai

Suggested Posts